[별첨] Todolist CSS, UI 리팩토링 (24년 6월 30일 기준)
2024. 6. 30. 14:33ㆍGithub 프로젝트/todolist반응형웹앱
728x90
반응형
SMALL
다음은 기존 UI 가 이쁘지 않아 디자인을 첨부한 코드를 진행하고자 한다.
우선 나는 Reactstrap, bootstrap-icons, 순수 CSS로만 디자인을 진행하였다.
그리고, 하는 김에 리팩토링을 진행해 보았다.
이 글은 10번까지 따라 한 후에 가장 나중에 반영 하기를 바란다.
https://github.com/BerkleyLim/Todolist
GitHub - BerkleyLim/Todolist: 리액트 기반 투두리스트 만들기
리액트 기반 투두리스트 만들기. Contribute to BerkleyLim/Todolist development by creating an account on GitHub.
github.com
[1,200px 이상 기준]

[600 ~ 1,200px 기준]
[600px 기준]

1. 서론
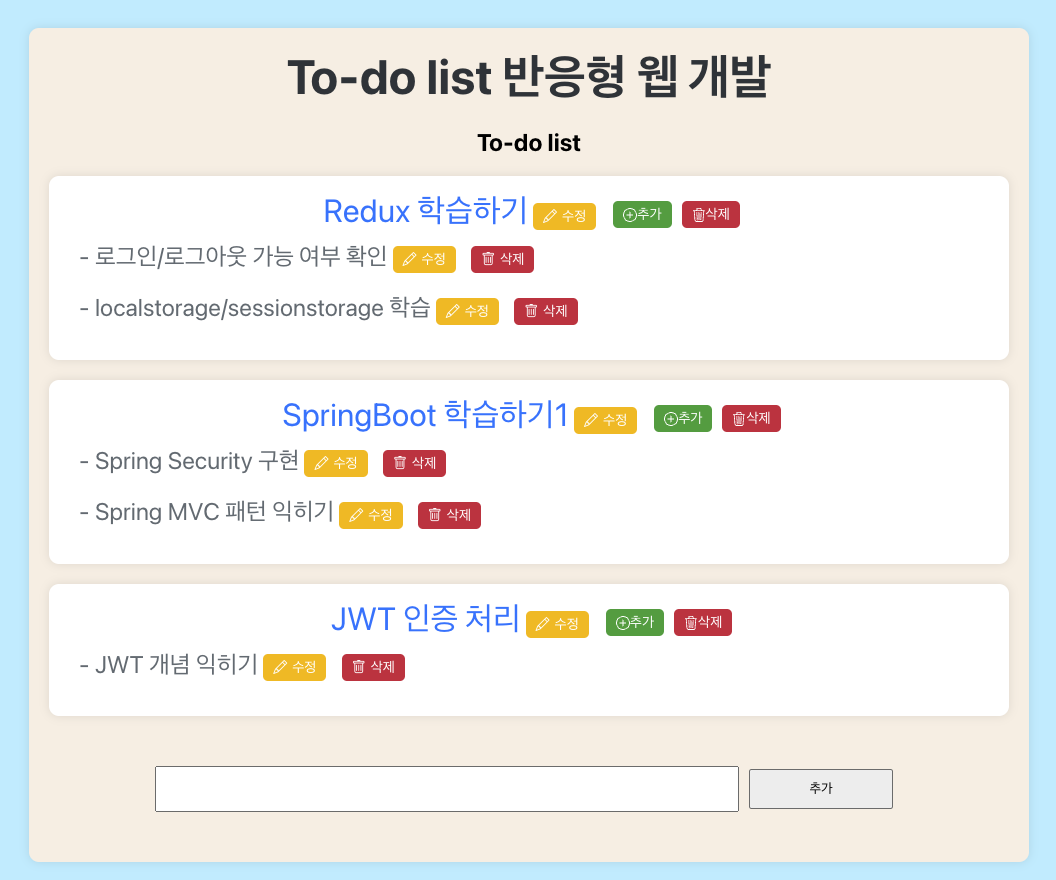
- 다음은 디자인을 아름답게 꾸미기 위해 진행하고자 한다.
- 컨텐츠 내용은 100%로 조정 하였으며, 1200px, 600px 기준으로 배경 색상만 적용하였다.
2. CSS 소스 코드
/* 반응형 웹 설정 */
/* 공통 스타일 */
.background-container {
  padding: 10px;
}

.container {
  margin: 0 auto;
  text-align: center;
  padding: 20px;
  border-radius: 10px;
  box-shadow: 0 0 10px rgba(0, 0, 0, 0.1);
}

.header-container {
  font-weight: bold;
  margin-bottom: 20px;
}

.todo {
  display: flex;
  flex-wrap: wrap;
  justify-content: space-between;
}

.todoContainer {
  width: 100%; /* 공통으로 100% 지정 */
  padding: 15px;
  border-radius: 10px;
  box-shadow: 0 0 10px rgba(0, 0, 0, 0.1);
  margin-bottom: 20px;
  background-color: #ffffff;
}

.todoTitle {
  padding-left: 10px;
  margin-bottom: 10px;
  color: #007bff;
}

.todoContents {
  padding-left: 15px;
  padding-bottom: 20px;
  text-align: left;
  color: #6c757d;
}

.addGroup {
  display: flex;
  justify-content: center;
  align-items: center;
  padding-top: 30px;
  padding-bottom: 30px;
}

.addInput,
.addButton {
  height: 40px;
  margin-right: 10px;
}

.addInput {
  width: 50%;
}

.addButton {
  width: 10%;
}

/* 공통 버튼 스타일 */
.todoContainer button {
  margin: 0 5px;
  padding: 5px 10px;
  font-size: 0.875rem;
  display: inline-flex;
  align-items: center;
  justify-content: center;
  border-radius: 5px;
  border: none;
  cursor: pointer;
}

.todoContainer button i {
  margin-right: 5px;
}

button.edit-button {
  background-color: #ffc107;
  color: #fff;
}

button.add-button {
  background-color: #28a745;
  color: #fff;
}

button.delete-button {
  background-color: #dc3545;
  color: #fff;
}

button.cancel-button {
  background-color: #6c757d;
  color: #fff;
}

/* 공통 입력 스타일 */
.mb-2 {
  margin-bottom: 0.5rem;
}

/* 1200px 초과시 */
@media (min-width: 1200px) {
  .background-container {
    margin: 5% 0 0 0;
  }

  .container {
    background-color: #f0f8ff; /* Light Blue */
    max-width: 1200px;
  }

  .header-container {
    color: #343a40;
    font-size: 4rem;
    margin-bottom: 30px;
  }

  .todoTitle {
    font-size: 2rem;
  }

  .todoContents {
    font-size: 1.5rem;
  }

  .addInput {
    width: 50%;
  }

  .addButton {
    width: 10%;
  }
}

/* 1200px 이하 일 경우 */
@media (max-width: 1200px) {
  .background-container {
    margin: 2% 0 0 0;
  }

  .container {
    background-color: #faf0e6; /* Linen */
    max-width: 960px;
  }

  .header-container {
    color: #343a40;
    font-size: 3rem;
  }

  .todoTitle {
    flex: 0 0 40%;
    font-size: 2rem;
  }

  .todoContents {
    flex: 0 0 100%;
    width: auto;
    font-size: 1.5rem;
  }

  .addInput {
    width: 60%;
  }

  .addButton {
    width: 15%;
  }
}

/* 600px 이하일 경우 */
@media (max-width: 600px) {
  .background-container {
    margin: 0;
  }

  .container {
    background-color: #ffebcd; /* Blanched Almond */
    padding: 10px;
  }

  .header-container {
    color: #343a40;
    font-size: 2.5rem;
    margin-bottom: 15px;
  }

  .todoTitle {
    width: 100%;
    font-size: 2rem;
  }

  .todoContents {
    padding-left: 15px;
    padding-bottom: 10px;
    font-size: 1.5rem;
  }

  .addInput {
    width: 70%;
  }

  .addButton {
    width: 20%;
  }
}
3. 메인
import React, { useRef, useState } from "react";
import BigList from "./category/big/index";
import SmallList from "./category/small/index";
import { useDispatch, useSelector } from "react-redux";
import update from "immutability-helper";
import { Button, Input } from "reactstrap";
import { useDrag, useDrop } from "react-dnd";
import "bootstrap-icons/font/bootstrap-icons.css"; // Bootstrap Icons 추가

const ItemTypes = {
  CARD: 'card'
}

const TodoMain = ({ index, todo, dndMoveTodoList }) => {
  const todoList = useSelector((state) => state.todoList.array);
  const dispatch = useDispatch();

  // todolist 소분류 추가 입력 모드 활성화 state
  // 여기는 소분류 입력 모드 활성화 및 비활성화 작업을 진행함
  const [isContentsAdd, setIsContentsAdd] = useState(false);

  // 다음은 생성시 바로 state문에 이벤트 표시되도록 설정
  const [isBehaviorChange, setIsBehaviorChange] = useState(false);

  const [createInputContents, setCreateInputContents] = useState();

  /**
   * todolist 소분류 추가 작업 입력
   */
  const addContentsOnChange = (e, index) => {
    const { name, value } = e.target;
    setCreateInputContents({ [index]: { [name]: value } });
    console.log(createInputContents);
  };

  /**
   *  Todolist 소분류 추가하는 기능
   */
  const createContentsButton = (todo, index) => {
    let tmp = todo;
    tmp?.contents.push(createInputContents[index].contents);
    dispatch({
      type: "setTodoList",
      array: update(todoList, {
        $merge: {
          [index]: tmp,
        },
      }),
    });
    // 생성 후 바로 입력모드 취소
    setIsContentsAdd(!isContentsAdd)
  };

  // drag and drop 관련
  // 참조 : https://velog.io/@suyeonme/React-DragDrop-%EA%B5%AC%ED%98%84%ED%95%98%EA%B8%B0
  // 문서 참조 : https://react-dnd.github.io/react-dnd/docs/api/use-drag
  const ref = useRef(null); // (*)

  const [, drop] = useDrop({
    // (*)
    accept: ItemTypes.CARD,
    hover(item, monitor) {
      if (item.index === index) return;
      if (!ref.current) return;

      const dragIndex = item.index;
      const hoverIndex = index;
      if (dragIndex === hoverIndex) return;

      const hoverBoundingRect = ref.current?.getBoundingClientRect();
      const hoverMiddleY = (hoverBoundingRect.bottom - hoverBoundingRect.top) / 2;
      const clientOffset = monitor.getClientOffset();
      const hoverClientY = clientOffset.y - hoverBoundingRect.top;

      if (dragIndex < hoverIndex && hoverClientY < hoverMiddleY) return;
      if (dragIndex > hoverIndex && hoverClientY > hoverMiddleY) return;

      dndMoveTodoList(dragIndex, hoverIndex);
      item.index = hoverIndex;
    },
  });

  const [{ isDragging }, drag] = useDrag({
    item: { type: ItemTypes.CARD, todo, index },
    type: ItemTypes.CARD,
    collect: (monitor) => ({
      isDragging: !!monitor.isDragging(),
    }),
  });

  drag(drop(ref)); // (*)
  // drag and drop 끝

  return (
    <div ref={ref} key={index} className="todoContainer">
      <BigList
        todo={todo}
        todoList={todoList}
        index={index}
        isContentsAdd={isContentsAdd}
        setIsContentsAdd={setIsContentsAdd}
      />

      {isContentsAdd && (
        <>
          {"소분류 추가용 Input : "}
          <Input
            name="contents"
            onChange={(e) => addContentsOnChange(e, index)}
            className="mb-2"
          />
          <Button color="primary" onClick={() => createContentsButton(todo, index)}>
            추가
          </Button>
        </>
      )}

      {todo?.contents?.map((tc, tcIndex) => (
        <div key={tcIndex} className="todoContents">
          <SmallList
            tc={tc}
            index={index}
            tcIndex={tcIndex}
            todoList={todoList}
            isBehaviorChange={isBehaviorChange}
            setIsBehaviorChange={setIsBehaviorChange}
          />
        </div>
      ))}
    </div>
  );
};

export default TodoMain;
4. BigList
import React, { useState } from "react";
import { PlusCircle, Trash3 } from "react-bootstrap-icons";
import { useDispatch, useSelector } from "react-redux";
import { Button, Input } from "reactstrap";
import update from "immutability-helper";

const BigList = ({ todo, index, isContentsAdd, setIsContentsAdd }) => {
  const todoList = useSelector((state) => state.todoList.array);
  const dispatch = useDispatch();

  // 갱신모드 설정
  const [isTitleUpdate, setIsTitleUpdate] = useState(false);

  // Todolist title 수정용 state
  const [changeTitle, setChangeTitle] = useState();

  // 수정용 메서드
  const updateTitlOnChange = (e, index) => {
    const { name, value } = e.target;
    setChangeTitle({ [index]: { [name]: value } });
  };

  // 수정 부분 입력 후 갱신 메서드
  const updateTitle = (index) => {
    /**
     * 불변성 유지하면서 갱신 시킬 수 있습니다.
     */
    dispatch({
      type: "setTodoList",
      array: update(todoList, {
        [index]: {
          title: { $set: changeTitle[index].title },
        },
      }),
    });
    // 갱신 후 바로 입력모드 해제
    setIsTitleUpdate(!isTitleUpdate)
  };

  // 삭제 관련 메소드 (제목)
  const removeTitle = (index) => {
    /**
     * 불변성 유지하면서 삭제 시킬 수 있습니다.
     */
    dispatch({
      type: "setTodoList",
      array: update(todoList, {
        $splice: [[index, 1]],
      }),
    });
  };

  return (
    <div className="todoTitle">
      {isTitleUpdate ? (
        <div>
          <Input
            name="title"
            defaultValue={todo?.title}
            onChange={(e) => updateTitlOnChange(e, index)}
            className="mb-2"
          />
          <Button color="primary" onClick={() => updateTitle(index)} className="edit-button">
            <i className="bi bi-pencil"></i> 수정
          </Button>
          <Button color="secondary" onClick={() => setIsTitleUpdate(!isTitleUpdate)} className="cancel-button">
            취소
          </Button>
        </div>
      ) : (
        <div>
          {todo?.title}
          <Button color="warning" onClick={() => setIsTitleUpdate(!isTitleUpdate)} className="edit-button">
            <i className="bi bi-pencil"></i> 수정
          </Button>{" "}
          <Button color="success" onClick={() => setIsContentsAdd(!isContentsAdd)} className="add-button">
            <PlusCircle /> 추가
          </Button>
          <Button color="danger" onClick={() => removeTitle(index)} className="delete-button">
            <Trash3 /> 삭제
          </Button>
        </div>
      )}
    </div>
  );
};

export default BigList;
5. SmallList
import React, { useState } from "react";
import { Trash3 } from "react-bootstrap-icons";
import { Button, Input } from "reactstrap";
import update from "immutability-helper";
import { useDispatch, useSelector } from "react-redux";

const SmallList = ({
                     tc,
                     index,
                     tcIndex,
                     isBehaviorChange,
                     setIsBehaviorChange
                   }) => {
  const dispatch = useDispatch();
  const todoList = useSelector((state) => state.todoList.array);
  const [updateInputContents, setUpdateInputContents] = useState();
  const [isContentsUpdate, setIsContentsUpdate] = useState(false);

  const updateContentsOnChange = (e, index, tcIndex) => {
    const { name, value } = e.target;
    setUpdateInputContents({ [index]: { [tcIndex]: { [name]: value } } });
    console.log(updateInputContents);
  };

  const updateContents = (index, tcIndex) => {
    let contents = updateInputContents[index][tcIndex].contents;
    let to = todoList[index];
    to.contents[tcIndex] = contents;

    dispatch({
      type: "setTodoList",
      array: update(todoList, {
        [index]: { $set: to },
      }),
    });
    setIsContentsUpdate(!isContentsUpdate);
    setIsBehaviorChange(!isBehaviorChange);
  };

  const removeContents = (index, tcIndex) => {
    let to = update(todoList[index].contents, {
      $splice: [[tcIndex, 1]],
    });

    dispatch({
      type: "setTodoList",
      array: update(todoList, {
        [index]: {
          contents: { $set: to },
        },
      }),
    });
  };

  return (
    <>
      {isContentsUpdate ? (
        <div>
          <Input
            name="contents"
            defaultValue={tc}
            onChange={(e) => updateContentsOnChange(e, index, tcIndex)}
            className="mb-2"
          />
          <Button color="primary" onClick={() => updateContents(index, tcIndex)} className="edit-button">
            <i className="bi bi-pencil"></i> 수정
          </Button>
          <Button color="secondary" onClick={() => setIsContentsUpdate(!isContentsUpdate)} className="cancel-button">
            취소
          </Button>
        </div>
      ) : (
        <div>
          - {tc}
          <Button color="warning" onClick={() => setIsContentsUpdate(!isContentsUpdate)} className="edit-button">
            <i className="bi bi-pencil"></i> 수정
          </Button>{" "}
          <Button color="danger" onClick={() => removeContents(index, tcIndex)} className="delete-button">
            <i className="bi bi-trash"></i> 삭제
          </Button>
        </div>
      )}
    </>
  );
};

export default SmallList;
6. TodoCreate
import React, { useState } from 'react'
import { useDispatch, useSelector } from 'react-redux';
import { Button, Form, Input } from 'reactstrap';

const TodoCreate = () => {
  const todoList = useSelector((state) => state.todoList.array);
  const dispatch = useDispatch();
  const [createInputTitle, setCreateInputTitle] = useState();

  /**
   * 다음은 TodoList 입력용 이벤트 함수
   */
  const createTitleOnchange = (e) => {
    const { name, value } = e.target;
    setCreateInputTitle({
      ...createInputTitle,
      [name]: value,
    });
  };

  /**
   * 입력시 Todolist 추가하는 기능
   */
  const createTitleButton = () => {
    let to = [];
    to.push(...todoList);
    to.push({
      title: createInputTitle?.title,
      contents: [],
    });
    /**
     * dispatch는 todolist.js 의 reducer의 action으로 사용되는 함수로
     * state 값을 변경시켜준다.
     * redux의 state 값은 불변성을 유지하는 것이 목적이다.
     * switch문의 action.type 변수에 따라 return으로 명령어대로 해당 state 값을 변경 시켜준다.
     */
    dispatch({ type: "setTodoList", array: to });
  };

  return (
    <Form className="addGroup">
      <Input
        className="addInput"
        name="title"
        value={createInputTitle?.title || ''}
        onChange={createTitleOnchange}
      />
      <Button className="addButton" color="primary" onClick={createTitleButton}>
        추가
      </Button>
    </Form>
  )
}

export default TodoCreate;
7. 마치며
이미지 리팩토링까지 모두 마쳐보았다.
여기까지 따라왔다면 진정한 프론트엔드 개발의 입문을 마치며 모두가 초급 개발자로 진입을 하기를 바란다. 이상 마친다.
728x90
반응형
LIST
'Github 프로젝트 > todolist반응형웹앱' 카테고리의 다른 글
| (10) TodoList 드래그앤드롭 적용하기 (0) | 2023.06.11 |
|---|---|
| (9) Todo List 클린 코드로 리팩토링 및 고도화 작업 (코드줄 줄이기, 분할, 필요없는 주석 제거 등) (0) | 2023.06.10 |
| (8) Todolist 메인 부분 이외의 상세부분의 대해 CRUD 작성 (0) | 2023.06.10 |
| (7) Todo List Redux - Local Storage로 state 리팩토링 (0) | 2023.06.09 |
| (6) Todo List 기본 기능 CRUD 추가 - 3 (삭제) (0) | 2023.06.08 |